
Powershell Pipelines
I recently participated in PowerShell Wednesday on the PDQ Discord server, and the topic was pipelines. I prepared a few notes in preparation and I thought it might be a good idea to share them here. I hope you find them useful!
Pipelines and the Objects Who Love Them
Pipelines are the life force of PowerShell. Pipelines allow you to take the output of one command and use it as the input for another command.
It’s like a factory production line, objects are passed from one command to the next, each command taking action on the objects it receives, and passing the results down the line.
RTFM
When in doubt, RTFM: Read The Friendly Manual.
The official Microsoft documentation can be found here: about_Pipelines
Learning Where You Are With Get-Help
🚨Useful tip alert!🚨
There are many extremely well-written documents that begin with about_, aptly named About Topics.
You can actually read them straight from your terminal! 🤯
For Example:
Get-Help about_Pipelines
If you receive an error like the following:
Get-Help : Get-Help could not find about_Pipelines in a help file in this session. To download updated help topics type: "Update-Help". To get help online, search for the help topic in the TechNet library at
https:/go.microsoft.com/fwlink/?LinkID=107116.
At line:1 char:1
+ Get-Help about_Pipelines -ShowWindow
+ ~~~~~~~~~~~~~~~~~~~~~~~~~~~~~~~~~~~~
    + CategoryInfo          : ResourceUnavailable: (:) [Get-Help], HelpNotFoundException
    + FullyQualifiedErrorId : HelpNotFound,Microsoft.PowerShell.Commands.GetHelpCommand
You likely need to update your help files. You can do this by running the following command:
Update-Help -Force -ErrorAction SilentlyContinue
Note that this will update the help files for all modules, not just the ones you are using. This…..can take a while.
But the knowledge you’ll gain is worth every second! Plus you can just do this in another terminal window.
The -ShowWindow Parameter
Bonus points: You can use the -ShowWindow parameter to open the help file in a new window, so you can continue to read it while you work in the terminal.
------------------------------------------------
Get-Help about_Pipelines -ShowWindow
------------------------------------------------
It will look like this:

When You Don’t Know What You Don’t Know
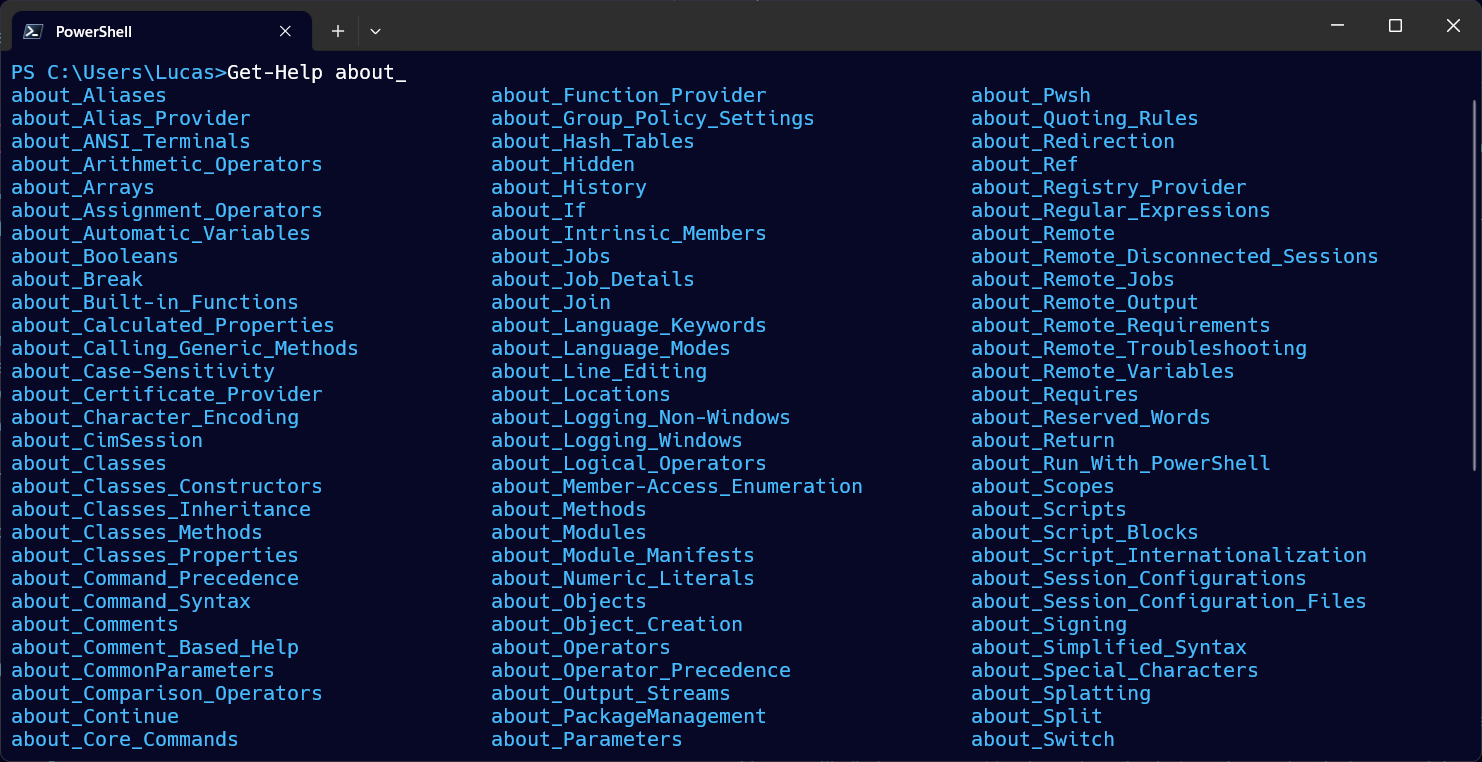
Bonus Bonus Points: If you have all your help files updated and ready to go, you can type:
Get-Help about_*
…but don’t press Enter, instead press Ctrl + Space to see a list of all the available about_ topics.
Okay Let’s Talk Pipelines
Chaining commands together in PowerShell is where the rubber meets the road. It allows you to combine the tools given to you in many ways. Later on in your PowerShell journey it will also enable you to do the same with the tools you create.
Since PowerShell is built on the idea of outputting objects, the pipeline is a very powerful tool and you can use it to do some pretty complex things without a very complex development process.
The Pipe
The pipe is the | character.
When you add a pipe to the end of a command, the output of the command will be given to the next command as input.
Input and Output
Input If you’ve ever used a PowerShell command, any parameter that you’ve passed to the command is input.
Output When the command finishes running, the result of the command is output.
Let’s Look at an Example
We’ll start with the Get-Service command, which returns a list of all the services on your computer.
More specifically, it returns an object for each service. Let’s use it to take a look at one of the most vital services on your computer.
PS C:\Users\Lucas>Get-Service -Name Fax


Status   Name               DisplayName
------   ----               -----------
Stopped  Fax                Fax
So the command returned an object for the fax service with three properties: Status, Name, and DisplayName.
There are more properties than just those three in the objects, but PowerShell has instructions to only display those for that type of object unless other wise specified.
And as I’m sure you’ve noticed, something is vitally wrong; the fax service is stopped! HOW WILL I RECEIVE MY FAXES?!
Okay let’s not panic everyone, let’s look at another command, Start-Service.
This command will start a service, and it takes the name of the service as input.
PS C:\Users\Lucas> Start-Service -Name 'Fax'
So far we’ve got two separate commands that operate independently.
So let’s pipelineify™️ this!
PS C:\Users\Lucas> Get-Service -Name 'Fax' | Start-Service
Huzzah! We did it!
We took the output of the Get-Service command and used it as input for the Start-Service command.
Now the fax service is running, and I can receive my faxes again!
Don’t Let PowerShell Out-Smart You
Sometimes a command takes a simple string as input, yet piping an entire object to the command will work just fine too.
We saw this in the Start-Service examples, where we passed the name of the service as a string to the -Name parameter AND we passed the object returned by Get-Service via the pipeline.
It’s because PowerShell is SMART
I find this can be a bit of a sticking point, and a quick peek at a more advanced topic will help you understand better.
Parameter Binding
It’s known as Parameter Binding
It’s also known as Writing Good Reusable Code
Put your pencils down, there’s no need to fully grasp Parameter Binding. I just want to ease your mind about whats really happening in that mysterious pipeline.
Parameter Binding means that when you create a function in PowerShell, you can give it all kinds of leeway in what kind of input it can accept.
So if you pass a string to the -Name parameter, it knows how to handle that.
If you pass an entire object representing that service, it has instructions for what to look for to determine what service has been passed in.
By looking at the help file for Set-Service, we get a hint about what the -Name parameter is looking for.
PS C:\Users\Lucas>Get-Help Start-Service -Parameter Name

-Name <System.String[]>
    Specifies the service names for the service to be started.

    The parameter name is optional. You can use Name or its alias, ServiceName , or you can omit the parameter name.

    Required?                    true
    Position?                    0
    Default value                None
>>> Accept pipeline input?       True (ByPropertyName, ByValue)           <<< Look at this line
    Aliases                      ServiceName
    Accept wildcard characters?  false
The line that says Accept pipeline input? True (ByPropertyName, ByValue) is the important part.
This means if an object is passed to the Set-Service command, it will accept that input and try to find the Name of the service by looking for a property called Name in the incoming object, or by looking for a property of the correct type, in this case System.String[]
This means that not only will an object with a Name property work if passed in, but the following will also work:
'Fax' | Start-Service
We passed in a string, and simply because string is the data type the command is looking for (and it accepts pipline input ByValue), it will work just fine.
Let’s Recap
- The pipe is the
|character - The pipe takes the output of one command and uses it as the input for the next command
- The pipe can be used to chain together multiple commands
- A command that takes a string as input likely also accepts an object as input
- PowerShell is smart enough to know what to do with the input you give it
With that in mind, let’s take a look at some examples of how to use the pipeline in PowerShell.
Other Examples of Using the Pipeline in PowerShell
Where-Object
Where-Object will take objects as input and only let the objects that match certain criteria continue on through the pipeline.
This command will get all the services on your computer, and only let the ones that are running continue on through the pipeline:
Get-Service | Where-Object Status -eq 'Running'
Select-Object
Select-Object lets all the objects continue on through the pipeline, but only lets certain properties of the objects continue on through the pipeline.
Get-Service | Select-Object -Property Name
Select-Object can also let only certain objects through, but only the amount of objects you specify.
Get-Service | Select-Object -First 5
It can do a lot more than that, checkout
Sort-Object
Sort-Object will take the objects and sort them based on the property you specify. You can do this in ascending or descending order.
Get-Service | Sort-Object -Property DisplayName -Descending
Altogether Now!
While these commands function on their own, we can use the pipeline to combine them to get the desired output.
Get-Service | Where-Object Status -eq 'Running' | Sort-Object -Property DisplayName -Descending | Select-Object -Property Name, DisplayName, Status
This command will get all the services on your computer, filter them down to only the ones that are running, sort them by display name in descending order, and then select only the Name, DisplayName, and Status properties of the objects.
ForEach-Object
The ForEach-Object command is for creating a logical loop. When you pipe objects into the ForEach-Object command, it will perform the code in the script block once per object. This is useful for when you have a command that doesn’t accept pipeline input.
The PokeDexAPI Module
Let’s take a look at a typical corporate IT example:
The PokeDexAPI module is a wrapper for interacting with the PokeDexAPI. As you can imagine, you can utilize this module to get information about everything related to Pokemon, a common need in corporate IT.
Here’s an example of one command in the module:
PS C:\Users\Lucas>Get-PokeDexPokemon

gen1  : 151
gen2  : 100
gen3  : 135
gen4  : 107
gen5  : 156
gen6  : 72
gen7  : 86
total : 807
Okay, so the command didn’t return information on a specific Pokemon like I expected but instead returned a count of Pokemon by generation.
Let’s check the help:
PS C:\Users\Lucas>Get-Help -Name Get-PokeDexPokemon

NAME
    Get-PokeDexPokemon

SYNOPSIS
    Gets Pokémon objects containing all the forms of the Pokémon specified by the Pokémon name or id.


SYNTAX
    Get-PokeDexPokemon [-Count] [<CommonParameters>]

    Get-PokeDexPokemon -slug <String[]> [<CommonParameters>]
#                       ^^^^  <--- This is the parameter we need to
#                                  use to get a specific Pokemon

DESCRIPTION
    The Get-PokeDexPokemon cmdlet gets Pokémon objects containing all the forms of the Pokémon specified by the Pokémon name or id.
We now know this command has a parameter called -slug that can get a specific Pokemon. It accepts a string of the Pokemon’s name or it’s id.
PS C:\Users\Lucas>Get-PokeDexPokemon -slug 25

number      : 25
name        : Pikachu
species     : Mouse
types       : {Electric}
abilities   : @{normal=System.Object[]; hidden=System.Object[]}
eggGroups   : {Field, Fairy}
gender      : {50, 50}
height      : 1' 04"
weight      : 13.2 lbs.
family      : @{id=10; evolutionStage=2; evolutionLine=System.Object[]}
starter     : False
legendary   : False
mythical    : False
ultraBeast  : False
mega        : False
gen         : 1
sprite      : https://nexus.traction.one/images/pokemon/pokemon/25.png
description : When it is angered, it immediately discharges the energy stored in the pouches in its cheeks.
Great! Now we can get a Pokemon by it’s name/id. But what if we want to get a list of all the Gen 1 Pokemon? We don’t want to type this command 151 times, just to get one generation of Pokemon.
Let’s pipe some numbers into the command using the ForEach-Object command.
PS C:\Users\Lucas> (1..151) | ForEach-Object {Get-PokeDexPokemon -slug $PSItem}
#                   This line will send all the numbers from 1 and 151
#                   into the ForEach-Object command, which will then
#                   run the code in the script block once for each number.
Never used ForEach-Object and curious about $PSItem?
This is an automatic variable (Get-Help about_Automatic_Variables) that contains the current object in the pipeline. So in this case, it will contain the number 1, then 2, then 3, etc as we loop through the numbers.
PS C:\Users\Lucas>(1..151) | ForEach-Object {Get-PokeDexPokemon -slug $PSItem} | Format-Table -AutoSize

number name          species types           abilities                                         eggGroups        gender       height weight     family
------ ----          ------- -----           ---------                                         ---------        ------       ------ ------     ------
1      Bulbasaur     Seed    {Grass, Poison} @{normal=System.Object[]; hidden=System.Object[]} {Monster, Grass} {87.5, 12.5} 2'04"  15.2 lbs.  @{id=1; evo…
2      Ivysaur       Seed    {Grass, Poison} @{normal=System.Object[]; hidden=System.Object[]} {Monster, Grass} {87.5, 12.5} 3'03"  28.7 lbs.  @{id=1; evo…
3      Venusaur      Seed    {Grass, Poison} @{normal=System.Object[]; hidden=System.Object[]} {Monster, Grass} {87.5, 12.5} 6'07"  220.5 lbs. @{id=1; evo…
3      Mega Venusaur Seed    {Grass, Poison} @{normal=System.Object[]; hidden=System.Object[]} {Monster, Grass} {87.5, 12.5} 7'10"  342.8 lbs. @{id=1; evo…

(etc...)
I piped this command into Format-Table to make the output a little shorter and save you from scrolling.
As you can see, we got a list of 3 pokemon, and we didn’t have to type the command 3 times!
That’s all for now! I hope you found this useful. ✌️